How Can We Help?
This article will provide a practical use for Game Plugins while also showing you how to set up multiple versions of Arizona Sunshine (Horde Mode, Campaign, and Single Player).
The first step is to head to the Your Games section:

From there, search for Arizona Sunshine Arcade and open it up. We first need to create 2 Variations. More could be made once you understand this whole process, but we just need 2. To create Variations, click on the Add Game Variation and you’ll want to do that twice to create 2 Variations:
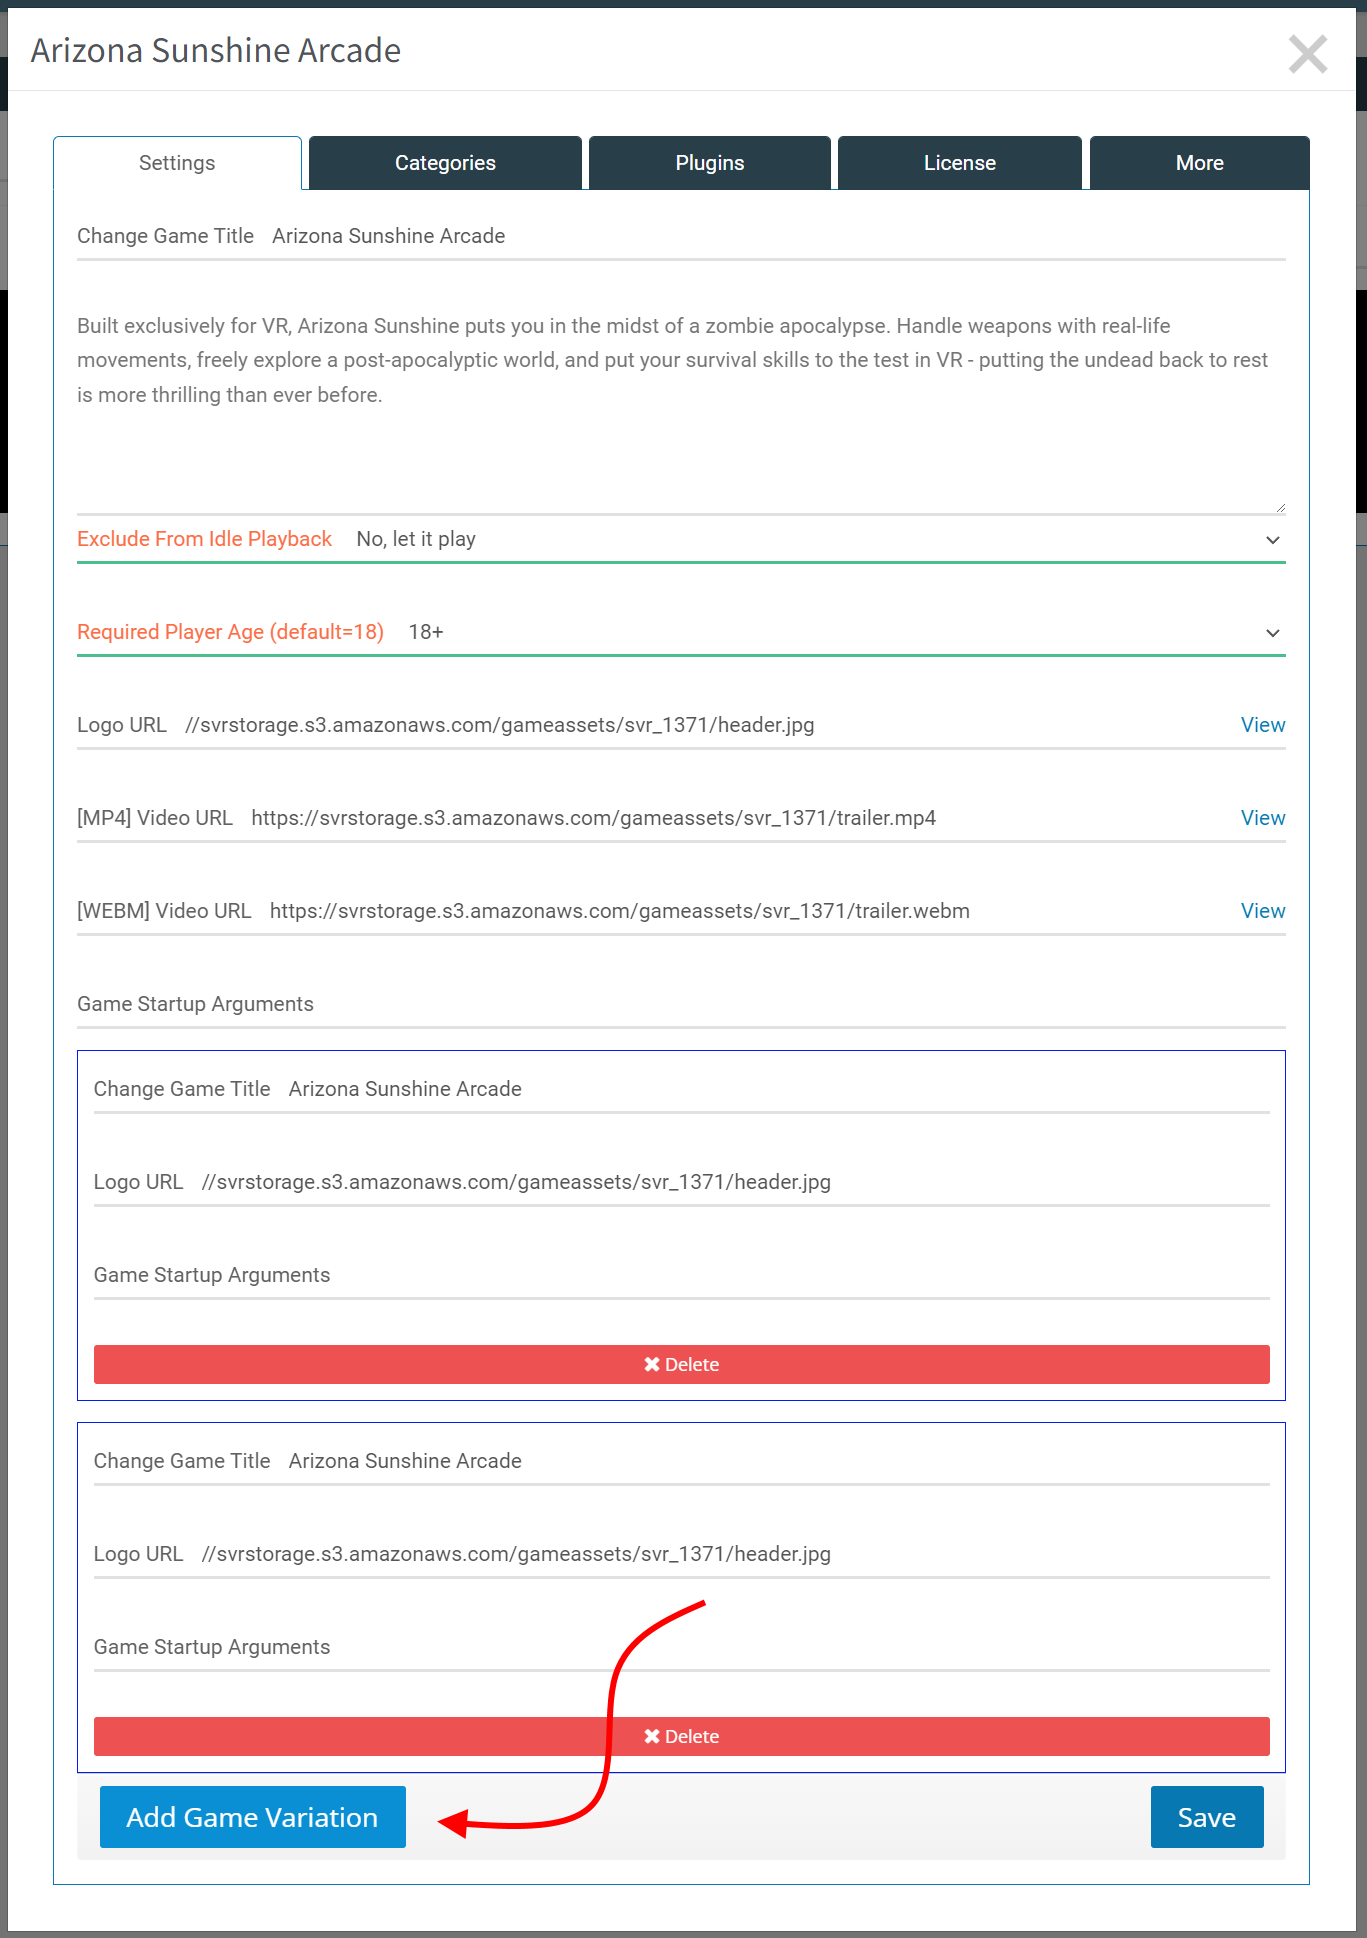
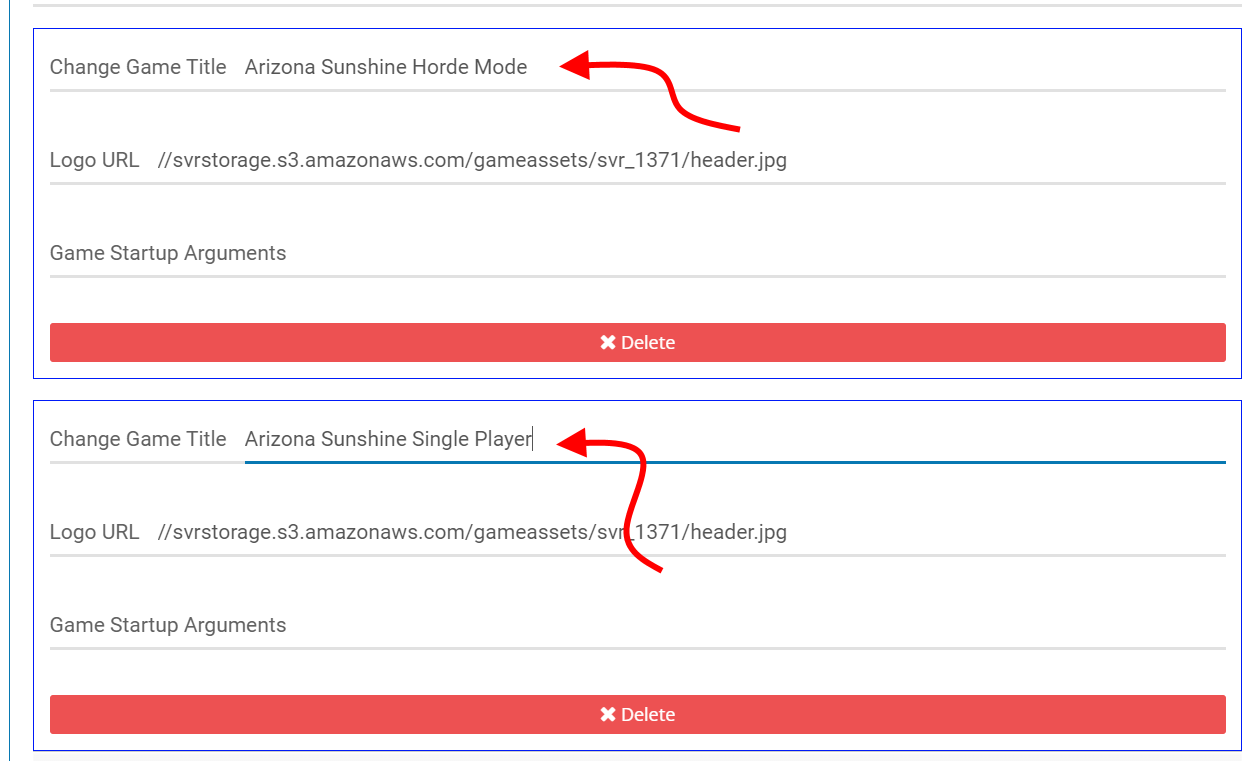
Once you the 2 Variations are there, you’ll want to rename them. Rename them to Arizona Sunshine Horde Mode and Arizona Sunshine Single Player. If you want, you can rename the primary Variation to Arizona Sunshine Campaign but that’s optional. Naming them will be important so we can find them later.
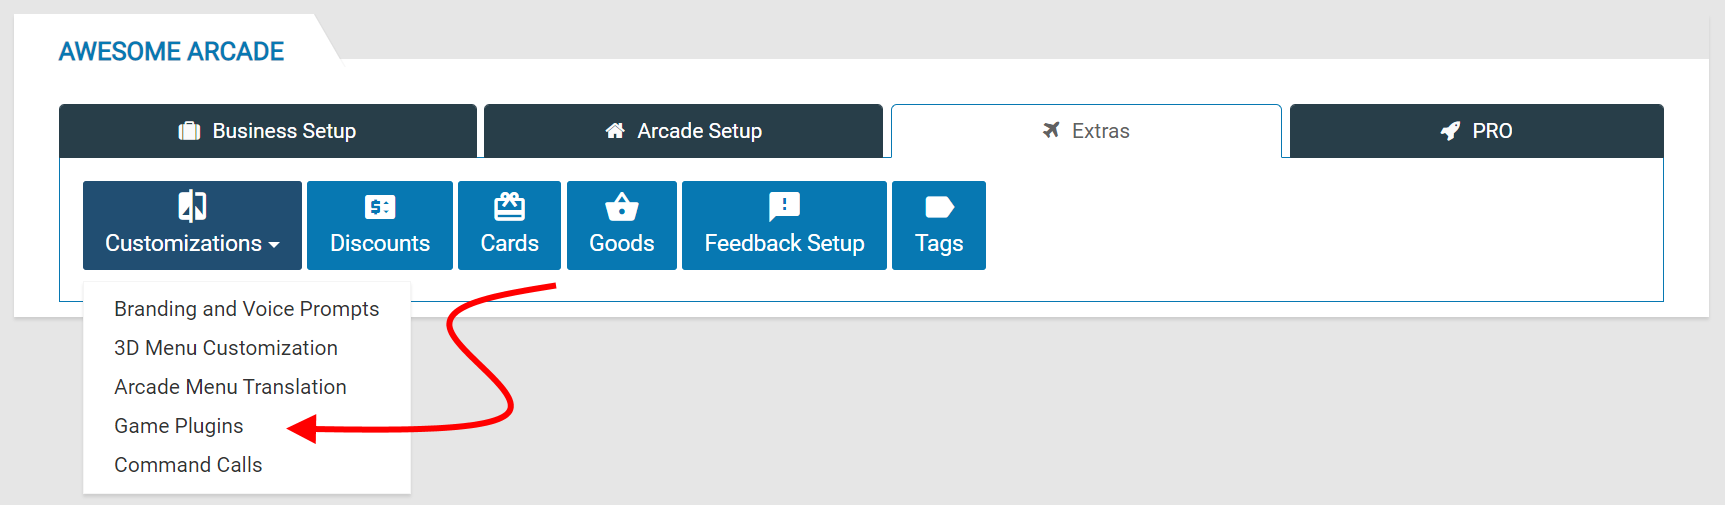
Once you’ve renamed them, click on the Save button at the bottom and you’ve completed step 1. The next step is to head to the Game Plugins section:
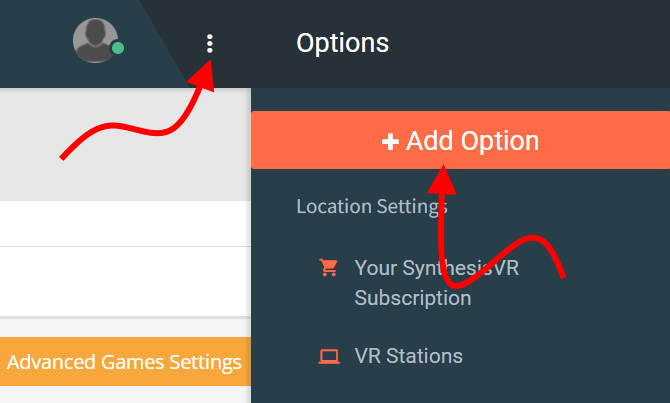
Once in the Game Plugins, you need to create 3 new Game Plugins and we’ll start with the first one. To create a new Game Plugin, click on the 3 dot menu and click on the Add Option:
For our first one, we’ll create the Horde Mode Game Plugin. Follow the image below exactly. Note that the Title is internal to this section and is not critical, but we recommend naming it something like the image so you can identify it if you need to edit it later:
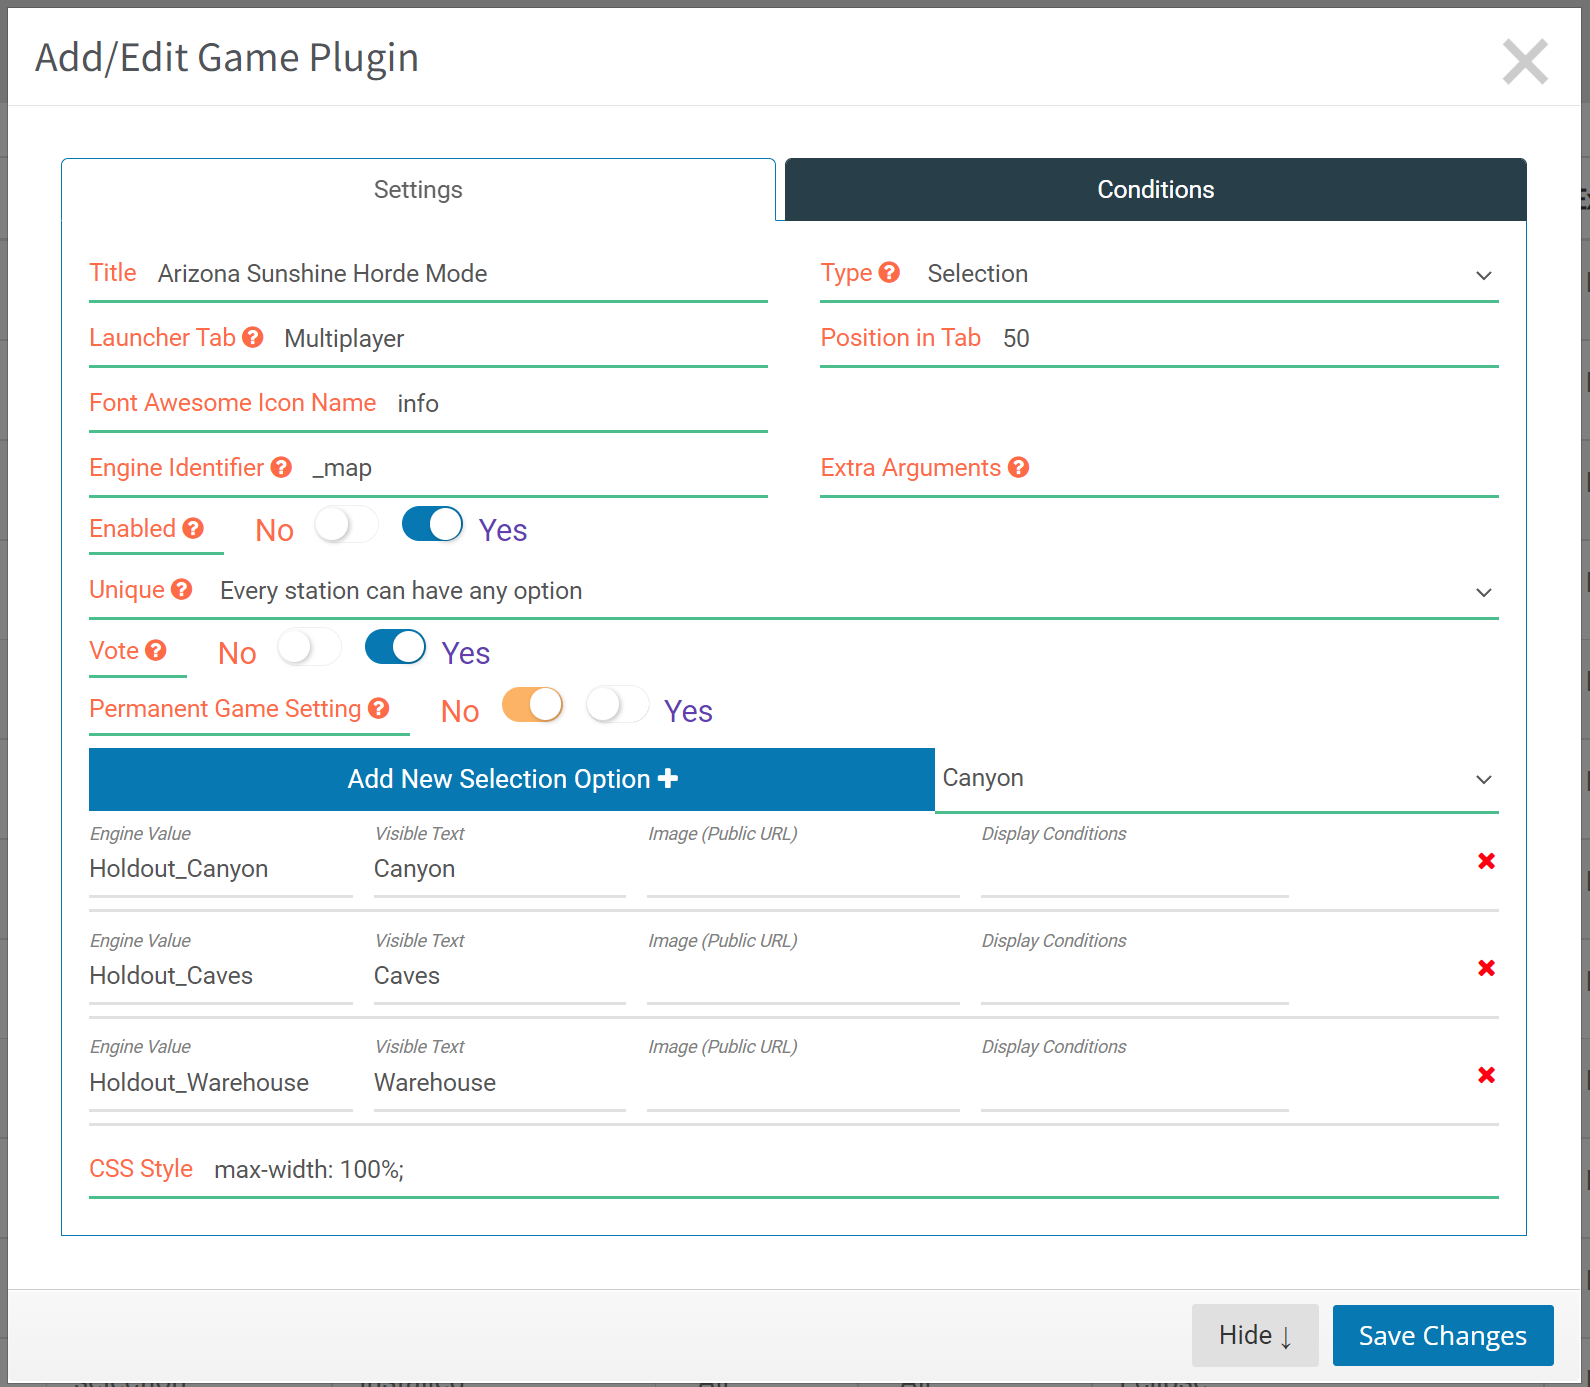
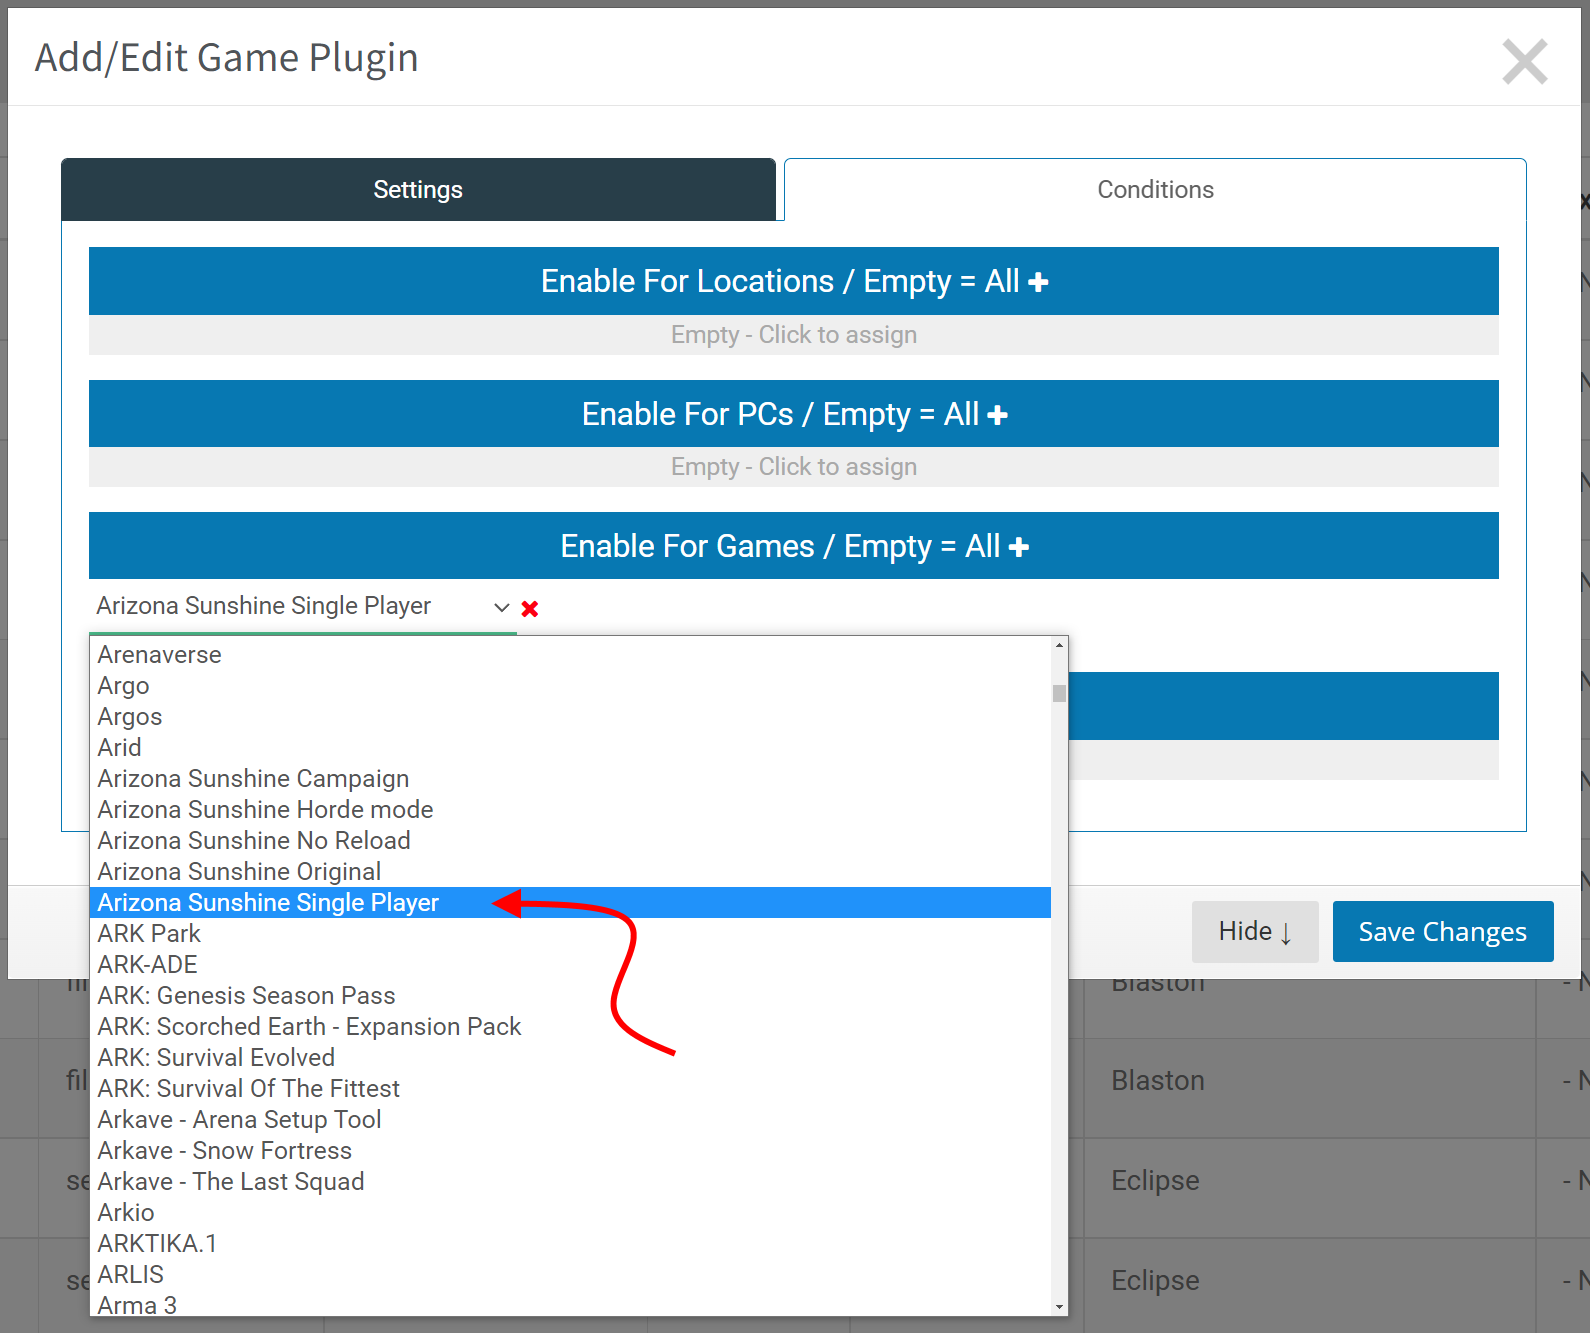
To add more Selection Options, you would need to click on the Add New Selection Option + button. If you need to remove one, click on the red x on the option you want to remove. Now that we’ve entered all the information above, we need to edit the Conditions tab to tell the system what game to associate things with. In the Conditions tab you need to click on the Enable For Games button and using the drop down menu you’ll need to find the Arizona Sunshine Horde Mode game variation:
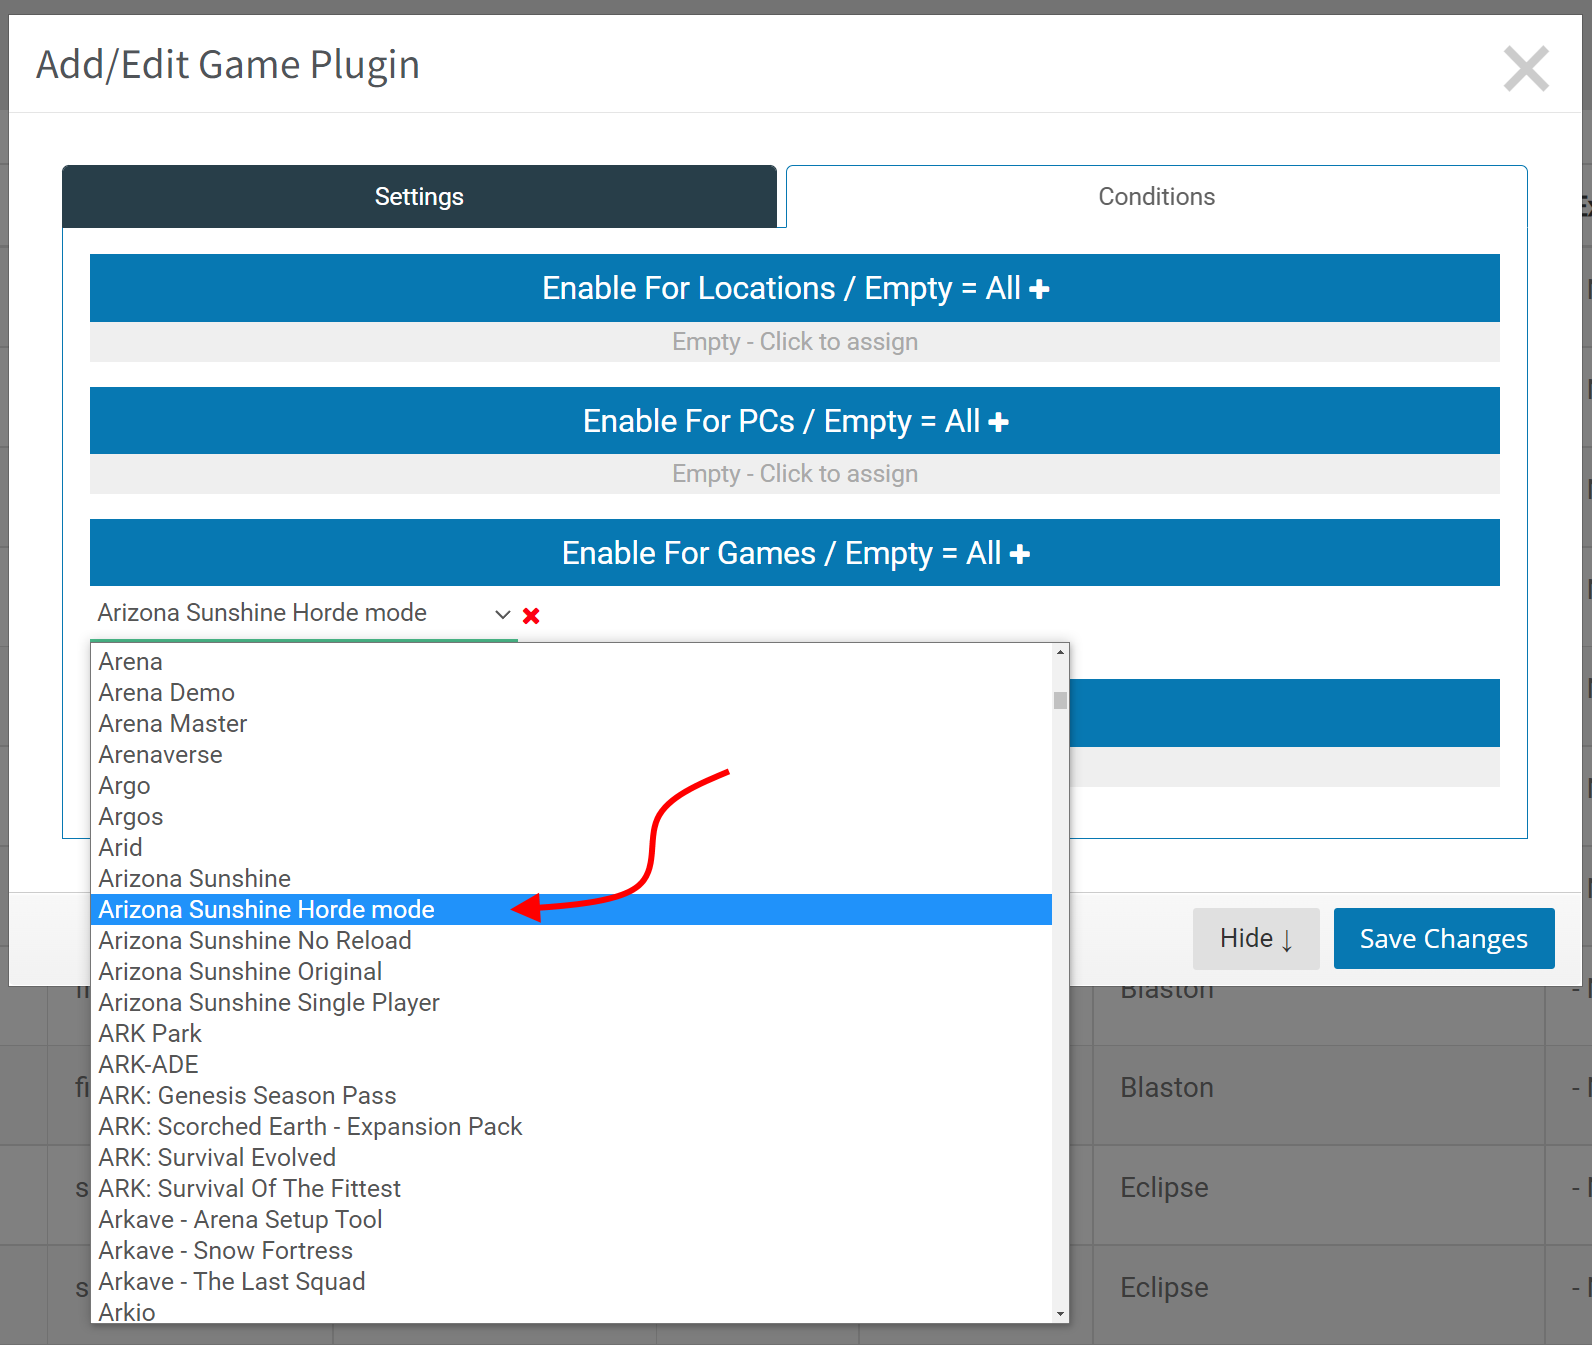
Once you’ve selected the Arizona Sunshine Horde Mode you can Save Changes. The final step is to edit the Config File for the settings for Horde Mode. To do that you need to click on the Advanced Games Settings button.

To keep things simple, copy the following code into the field:
{<svr static="EmulateSynthesisVRLobby" minpcs="2" maxpcs="4"></svr>
"IsMultiplayer": "<svr condition="pcs" min="2" max="4" true="yes" false="no"></svr>",
"IsHost": "<svr condition="is_server" true="yes" false="no"></svr>",
"NumberOfPlayers": <svr static="pcs"></svr>,
"AutoStart": "<svr condition="pcs" min="2" max="4" true="svr:_map#" true-default="Holdout_Warehouse" false="" false-default=""></svr>",
"ConnectIPAddress": "<svr static="server_ip"></svr>",
"ForceLanguage": "",
"Difficulty": "Easy",
"ForceEnableRotation": "no",
"HordeModePlayTime": "00:00:00",
"MutilationAndBlood": "yes",
"LaserSight": "no",
"SingleHandMode": "no",
"ForceLeftHanded": "<svr static="svr:_hand#" empty="no"></svr>",
"InvincibleAtStartOfLevelSeconds": 180.0,
"FriendlyFire": "yes",
"SelfDamage": "yes",
"Invincibility": "no",
"InfiniteAmmo": "no",
"ForceStartWeaponMainHand": "M9",
"ForceStartWeaponOffHand": "M9",
"ForceStartWeaponSingleHand": "K50M",
"AutoSkipEndScreenTime": "00:00:30",
"ShutDownAfterEndScreen": "no",
"LocalLeaderboardNetworkFolderPath": "",
"NetworkTickRate": 20,
"InputDeviceLeftModelType": "",
"InputDeviceRightModelType": "",
"MainMenuQuitButton": "yes",
"WalkingLocomotion": "<svr static="svr:katvr#" empty="no"></svr>",
"MatchMakerBranch": "",
"RenderScale": 1.0,
"GraphicsQualityLevel": 2,
"PlayerNamePreset": "<svr static="svr:playername#" empty="Player"></svr>"
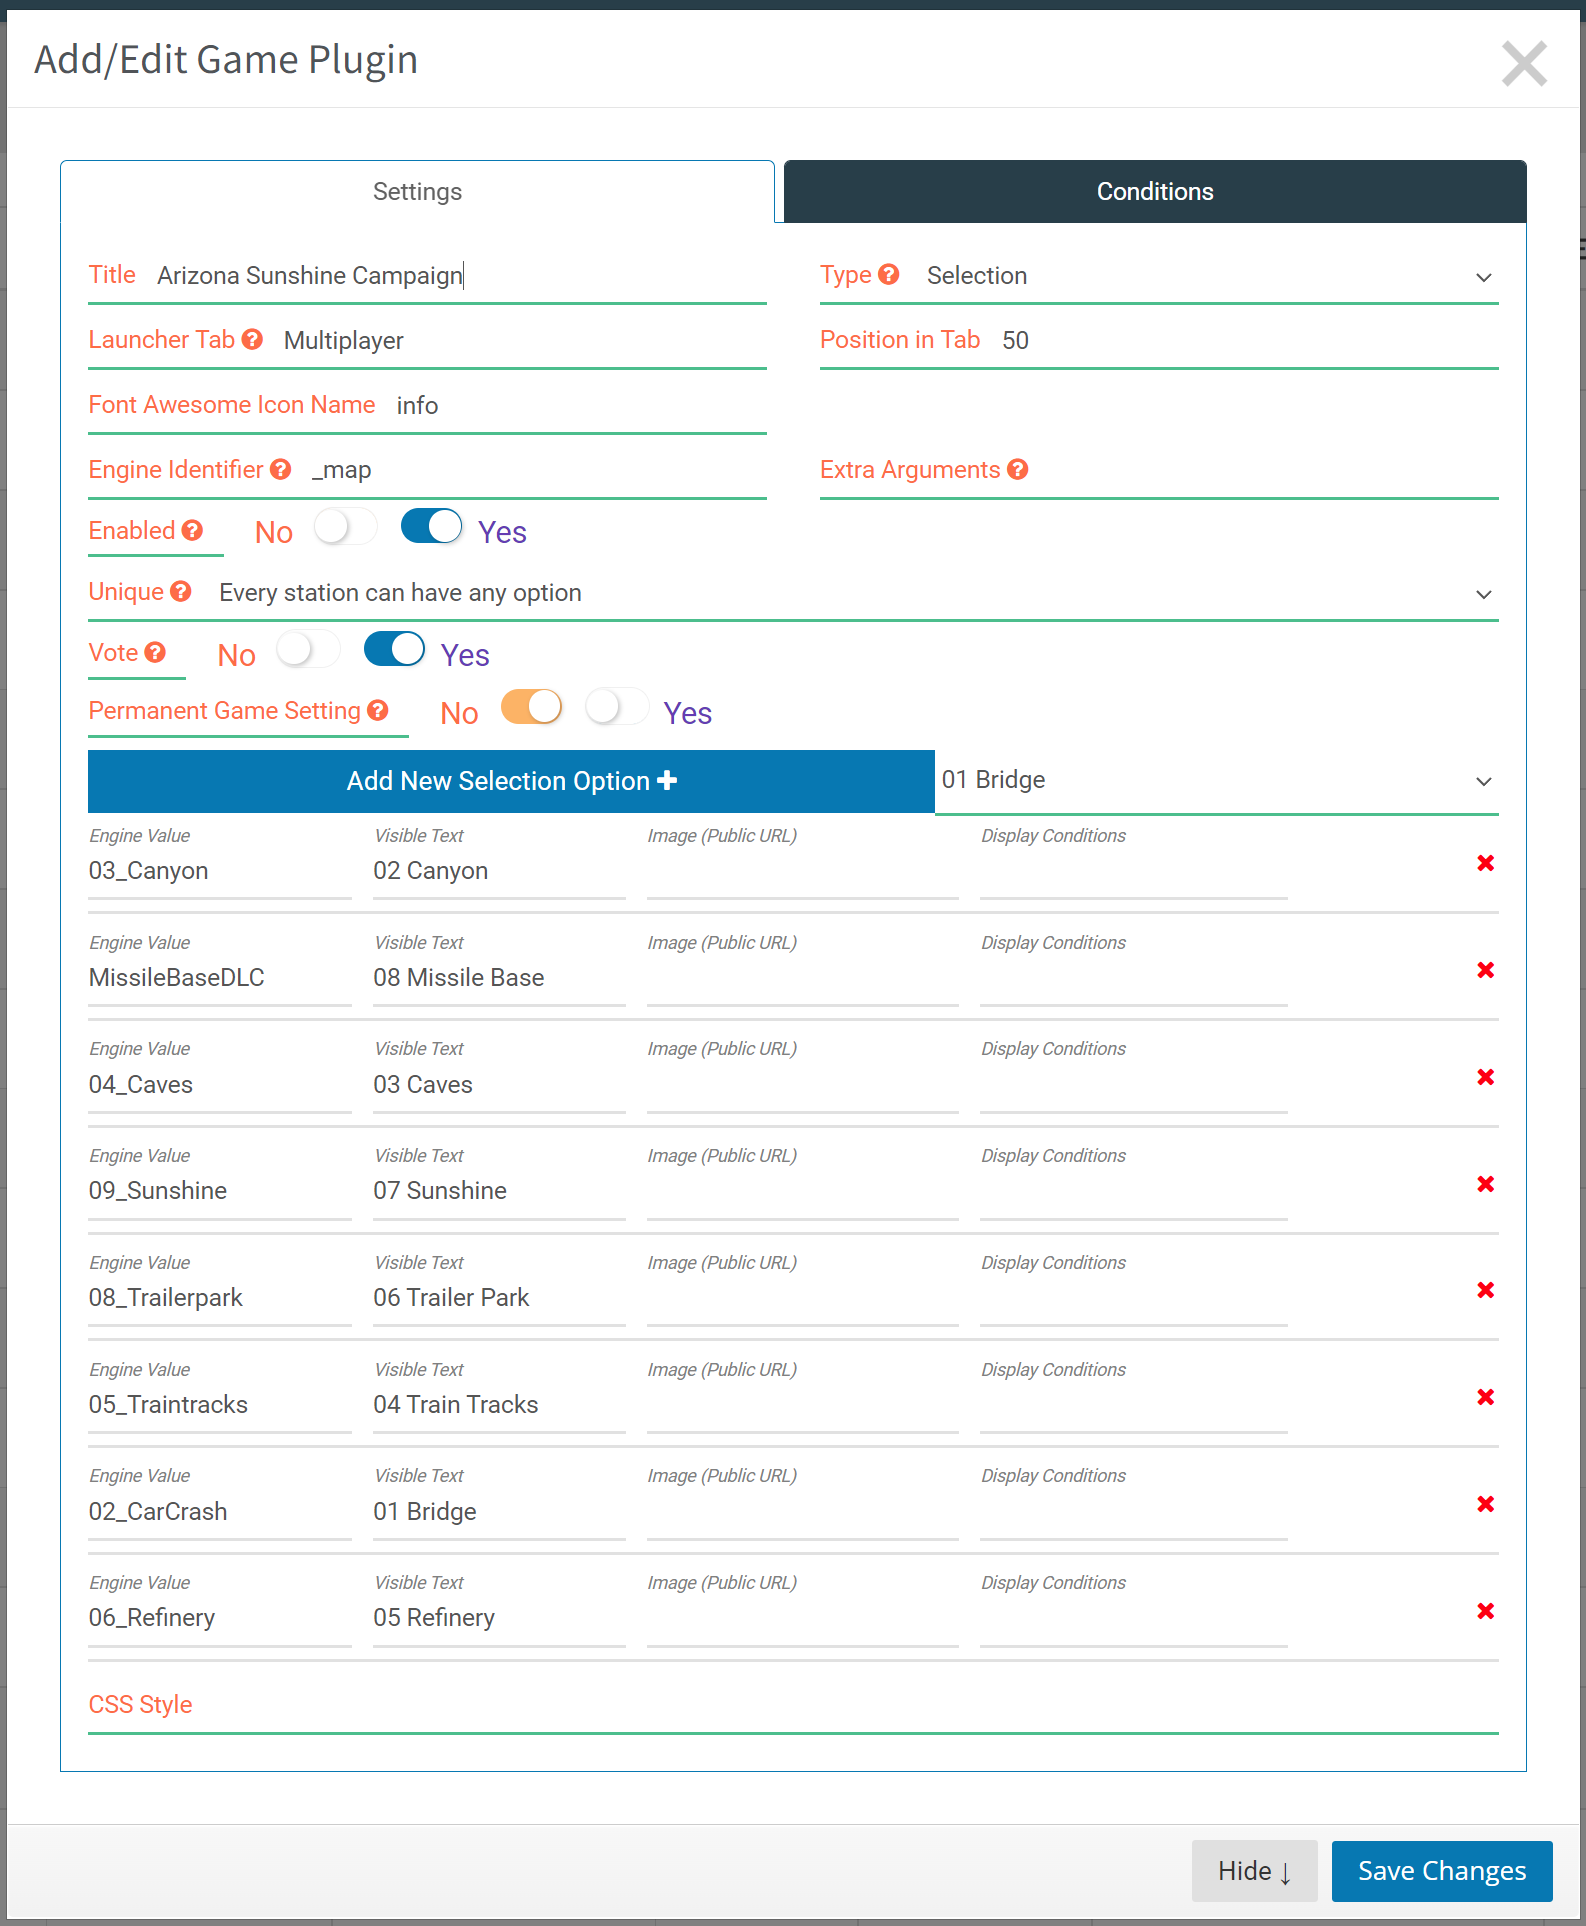
}Note that you should not click on the Load Default if you want to allow the automated SynthesisVR Provisioning to do its thing. Additionally, you can feel free to edit any of the above if you want to change some of the parameters once you feel comfortable. Once you’ve copied this info, click on Save. And that’s one Game Plugin done! 2 more to go. Create a new Game Plugin and for this one we’re going to create the Campaign Variation (for 2 players). Please refer to the following image for all the settings:
And in the Conditions tab, you’ll want to add the main Variation of the game (and if you renamed it to Arizona Sunshine Campaign, you’re ahead of the game ?).
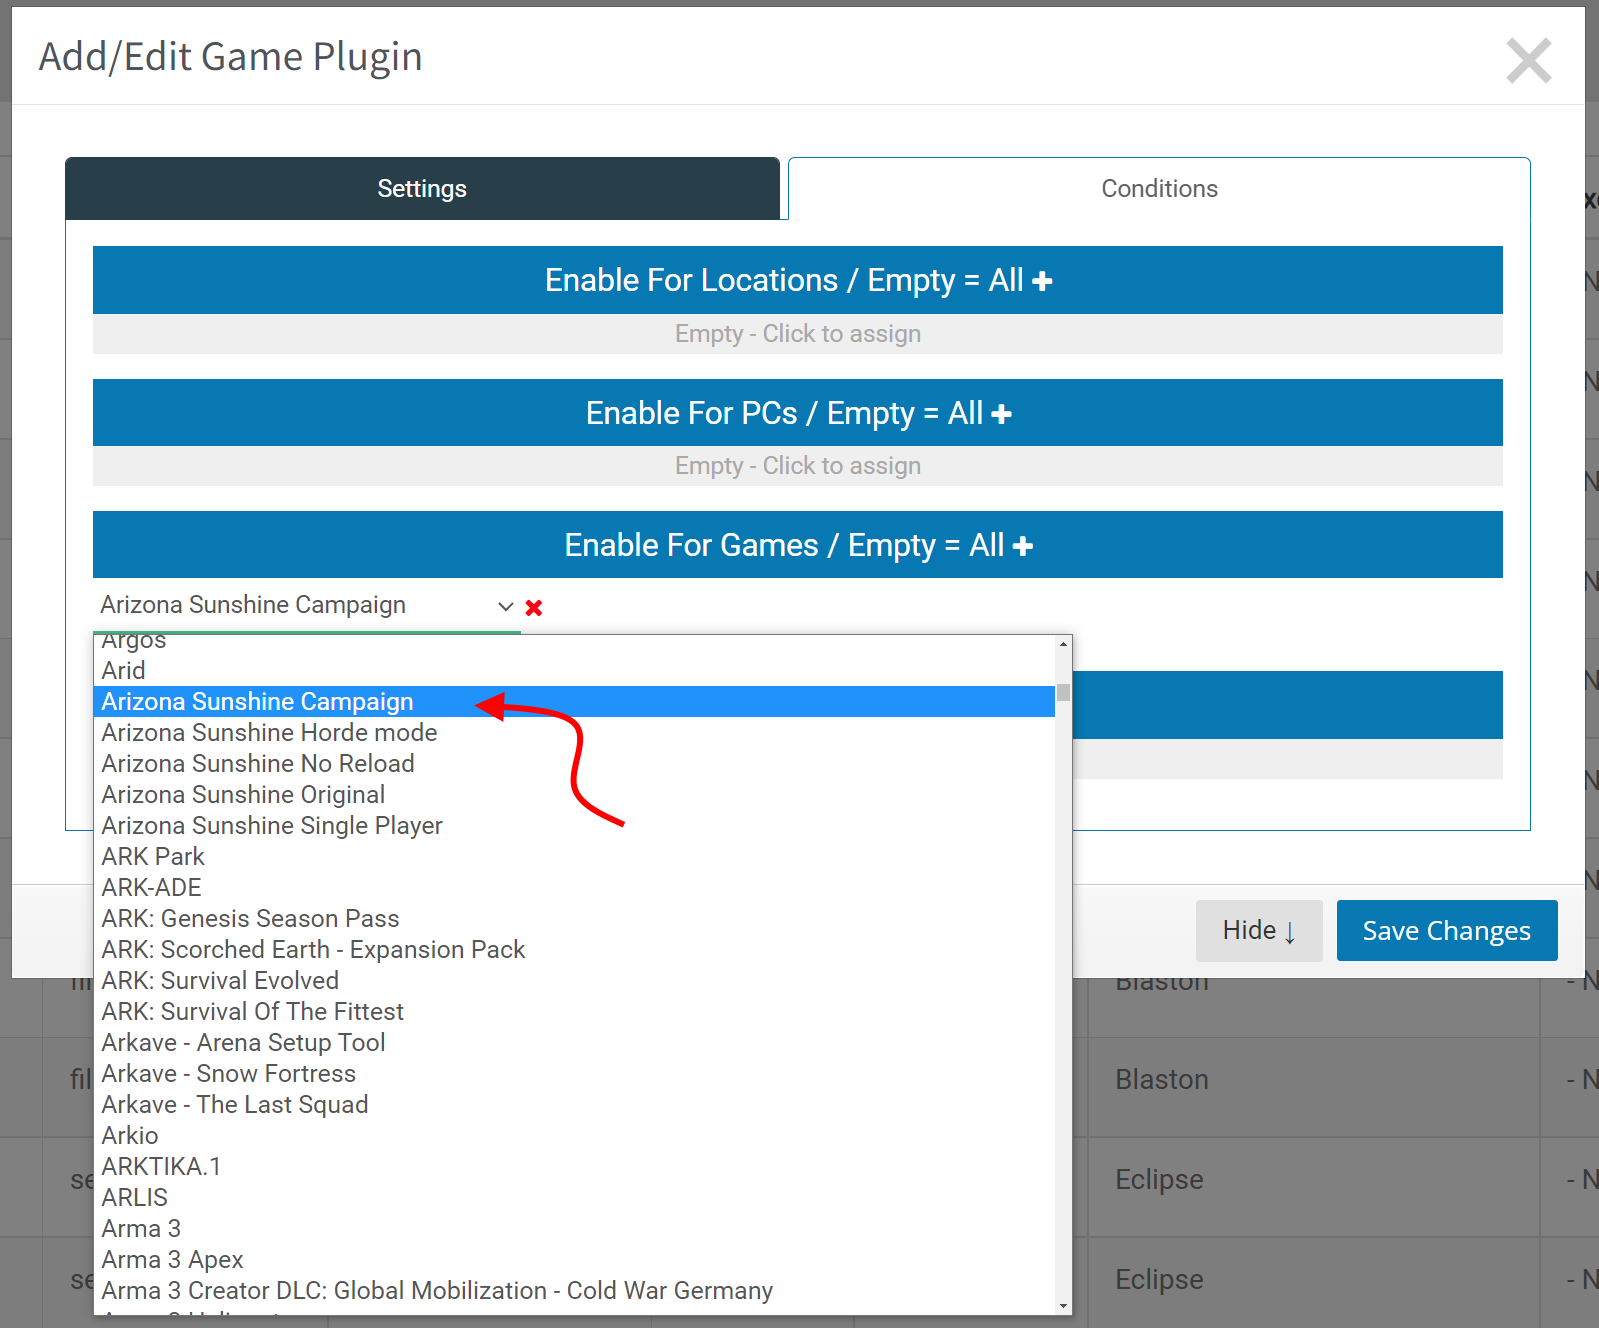
Save Changes and now copy the following code into the Advanced Game Settings:
{<svr static="EmulateSynthesisVRLobby" minpcs="2" maxpcs="9"></svr>
    "IsMultiplayer": "<svr condition="pcs" min="2" max="4" true="yes" false="no"></svr>",
    "IsHost": "<svr condition="is_server" true="yes" false="no"></svr>",
    "NumberOfPlayers": <svr static="pcs"></svr>,
    "AutoStart": "<svr condition="pcs" min="2" max="4" true="svr:_map#" true-default="Holdout_Warehouse" false="" false-default=""></svr>",
    "ConnectIPAddress": "<svr static="server_ip"></svr>",
    "ForceLanguage": "",
    "Difficulty": "Easy",
    "ForceEnableRotation": "no",
    "HordeModePlayTime": "00:00:00",
    "MutilationAndBlood": "yes",
    "LaserSight": "no",
    "SingleHandMode": "no",
    "ForceLeftHanded": "<svr static="svr:_hand#" empty="no"></svr>",
    "InvincibleAtStartOfLevelSeconds": 180.0,
    "FriendlyFire": "yes",
    "SelfDamage": "yes",
    "Invincibility": "no",
    "InfiniteAmmo": "no",
    "ForceStartWeaponMainHand": "M9",
    "ForceStartWeaponOffHand": "M9",
    "ForceStartWeaponSingleHand": "K50M",
    "AutoSkipEndScreenTime": "00:00:30",
	"ShutDownAfterEndScreen": "no",
    "LocalLeaderboardNetworkFolderPath": "",
    "NetworkTickRate": 20,
    "InputDeviceLeftModelType": "",
    "InputDeviceRightModelType": "",
    "MainMenuQuitButton": "yes",
    "WalkingLocomotion": "<svr static="svr:katvr#" empty="no"></svr>",
    "MatchMakerBranch": "",
    "RenderScale": 1.0,
    "GraphicsQualityLevel": 2,
	"PlayerNamePreset": "<svr static="svr:playername#" empty="Player"></svr>"
}
And Save when done. We’re almost there! One more Game Plugin. For that one, we’re going to create the Single Player Variation. When you create the new Game Plugin, you’re going to actually use the same settings that we did for the Campaign Variation above and this time you’ll choose the Single Player Variation in the Conditions tab:
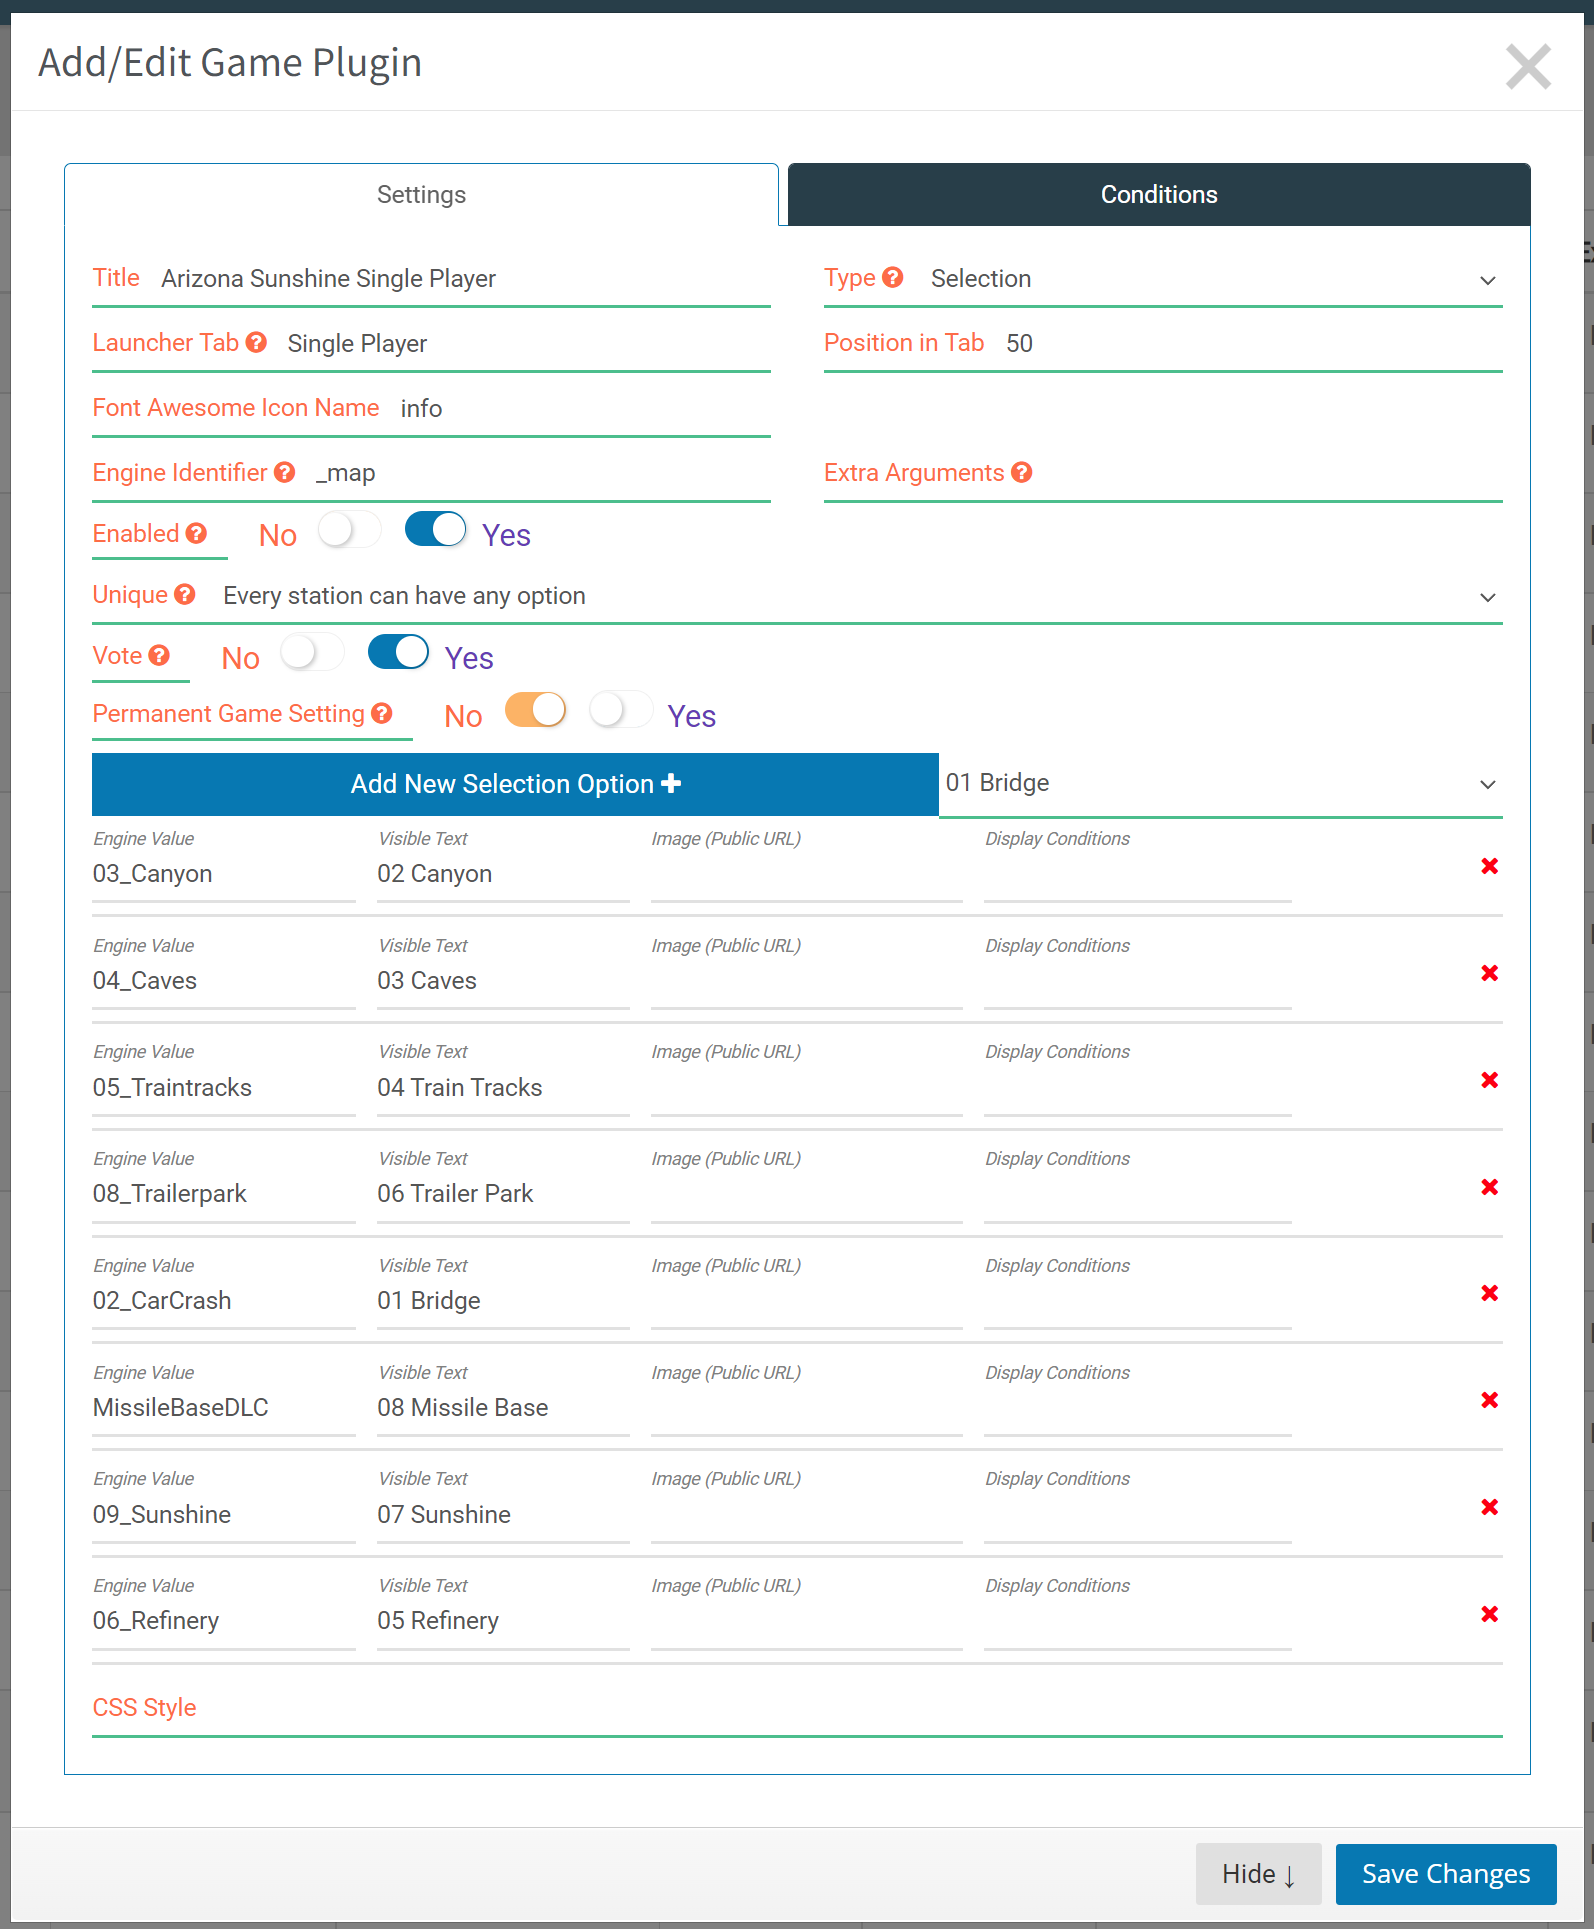
And for the Advanced Game Settings, copy this code:
{<svr static="EmulateSynthesisVRLobby" minpcs="1" maxpcs="9"></svr>
"IsMultiplayer": "<svr condition="pcs" min="1" max="1" true="no" false="yes"></svr>",
"IsHost": "<svr condition="is_server" true="no" false="yes"></svr>",
"NumberOfPlayers": <svr static="pcs"></svr>,
"AutoStart": "<svr condition="pcs" min="1" max="1" true="svr:_map#" true-default="Holdout_Warehouse" false="" false-default=""></svr>",
"ConnectIPAddress": "<svr static="server_ip"></svr>",
"ForceLanguage": "",
"Difficulty": "Easy",
"ForceEnableRotation": "no",
"HordeModePlayTime": "00:00:00",
"MutilationAndBlood": "yes",
"LaserSight": "no",
"SingleHandMode": "no",
"ForceLeftHanded": "<svr static="svr:_hand#" empty="no"></svr>",
"InvincibleAtStartOfLevelSeconds": 180.0,
"FriendlyFire": "yes",
"SelfDamage": "yes",
"Invincibility": "no",
"InfiniteAmmo": "no",
"ForceStartWeaponMainHand": "M9",
"ForceStartWeaponOffHand": "M9",
"ForceStartWeaponSingleHand": "K50M",
"AutoSkipEndScreenTime": "00:00:30",
"ShutDownAfterEndScreen": "no",
"LocalLeaderboardNetworkFolderPath": "",
"NetworkTickRate": 20,
"InputDeviceLeftModelType": "",
"InputDeviceRightModelType": "",
"MainMenuQuitButton": "yes",
"WalkingLocomotion": "<svr static="svr:katvr#" empty="no"></svr>",
"MatchMakerBranch": "",
"RenderScale": 1.0,
"GraphicsQualityLevel": 2,
"PlayerNamePreset": "<svr static="svr:playername#" empty="Player"></svr>"
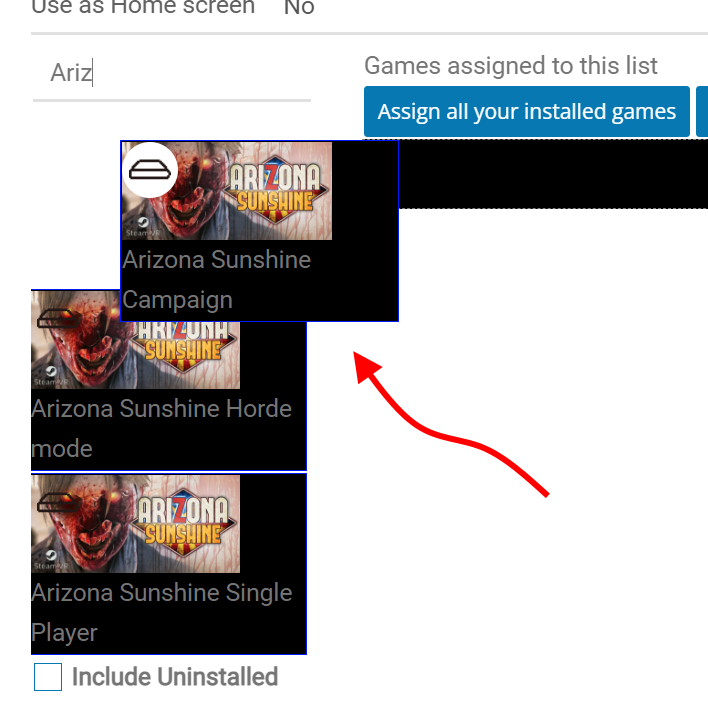
}And that’s it for the Game Plugins, not so hard, one more step and you’ll be done and the magic will begin! The final step would be to add each one of these Variations into at least one Game Categories. We won’t be going into detail about that here, but one thing to note is when you go to add a game into a Game Category, you would want to use the search field for Arizona Sunshine and drag the appropriate game into the appropriate Game Category.
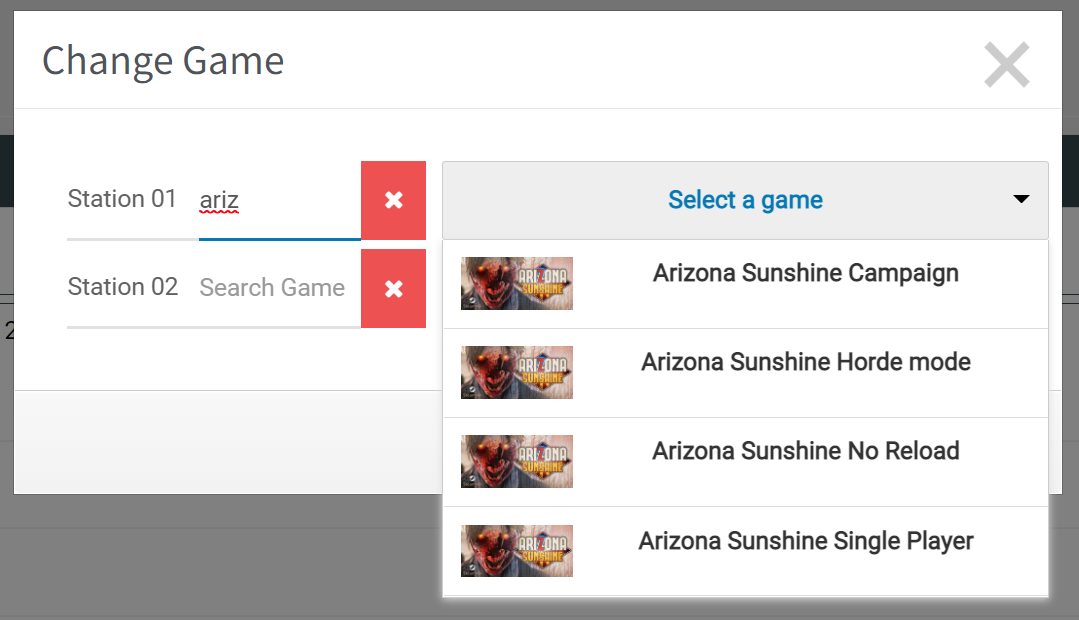
Finally at the end! But you’re probably wondering what all the above does. Glad you asked. When you launch a session on your stations and go to choose Arizona Sunshine, you’ll be presented with several choices at this point:
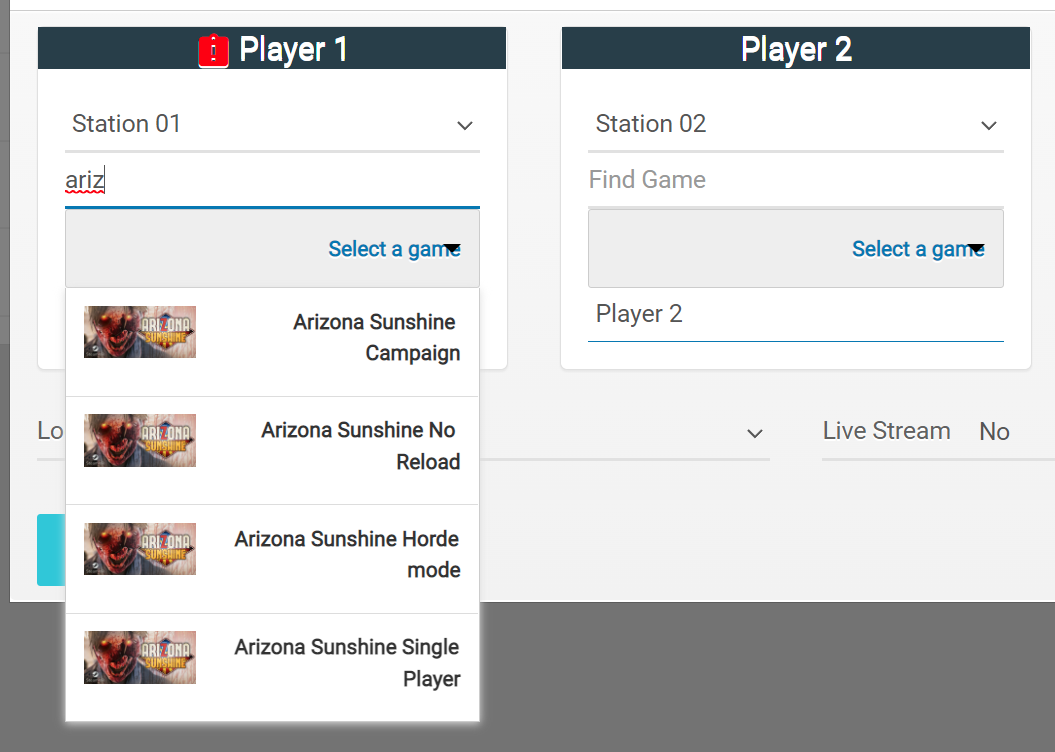
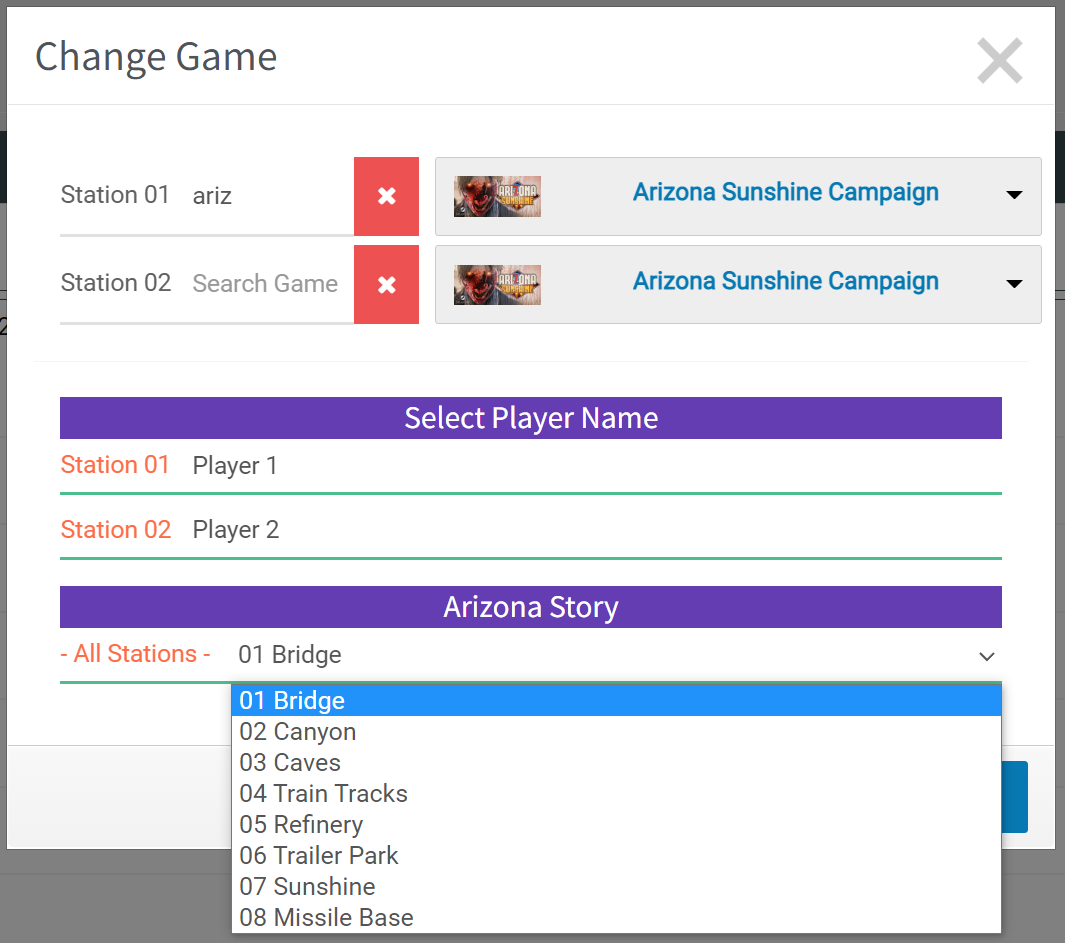
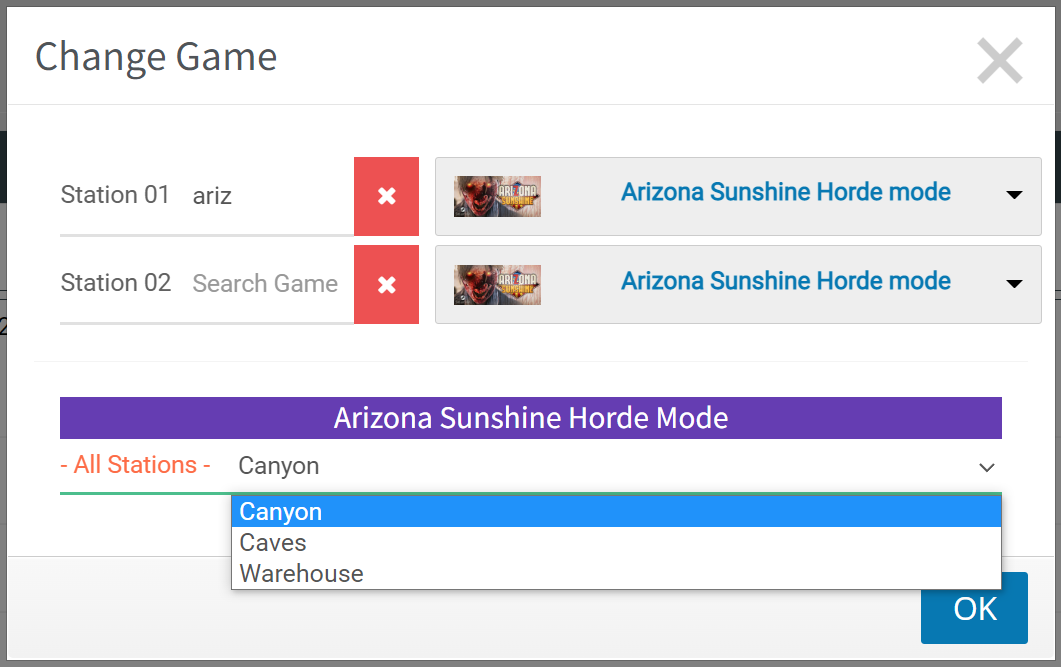
Depending on which version you choose, you will then be presented with additional options:
And now when the game launches, it puts people directly into that specific variation together without the need of having them go into the menus to create things. The additional bonus is if you do use customer’s name in the session launch (and you keep the SynthesisVR parameters in the Advanced Game Settings), the names will be automatically interjected in the game and they don’t have to do that part either.