How Can We Help?
Introduction
Synthesis VR is a software platform for location-based virtual reality (LBVR) device management and content licensing. Our platform achieves this goal with a “Synthesis” of multiple pieces of software.
Synthesis VR Software Stack
- Local Manager (Desktop Application) – A launcher/manager/operator app to control your VR location effortlessly.
- Synthesis VR Proxy (Invisible Application)– A Windows service that runs in the background of a single computer, synchronizing all of your hardware with our cloud.
- Synthesis VR Access Point (Desktop Application/Android Application) – An app for your VR Gaming PCs & Android headsets to communicate with the Synthesis VR Proxy.
Step 1: Requirements
- A Synthesis VR Account
- Don’t have an account?
Step 2: Log in to the Synthesis VR Web Terminal
Step 3: Download and Install the Local Manager Application On Your Master Computer
Step 4: Download the Synthesis VR Installer
Step 5: Install The Synthesis VR Proxy On The Master Computer
Important Notes
- Only install the proxy ONCE. Only 1 proxy per location, no more, no less
- The proxy can be installed on any windows computer.
- The proxy is typically installed on the chosen “master computer”
- This computer must be on the same network as your VR devices and other computers.
Step 6: Choose your VR Platform – Standalone Headsets or PCVR?
If you are using Standalone Headsets (Meta Quest / HTC VIVE Focus 3 / Pico)
Please Go To Step 7 and Disregard Step 8
If you will be using PCVR with a Windows Gaming PC OR Setting up a Dedicated Game Server for “Game Server Automation”
Please Disregard Step 7 and go to step 8
Step 7: Install Synthesis VR on a Standalone Headset (Meta Quest, HTC VIVE Focus, PICO)
Step 8: Install Synthesis VR Access Point (PCVR)(Windows)
*Please Note: If you will not be running PCVR with gaming computers, but instead will be utilizing standalone android headsets, go back to Step 7
This Access Point App will need to be installed on all gaming stations.
- Identify and access another computer you wish to be a VR Station.
- Download the Synthesis VR Installer if you have not already done so on this PC.
- Note: Make sure you have SteamVR running prior to installing the Synthesis VR Access Point
- Reminder: Each station needs to have a different Steam account attached to it.
- Open the Synthesis VR installation file (the same one downloaded for the Server).
- Follow the installation pop-up window and select the destination to be installed. This should not need to be changed.
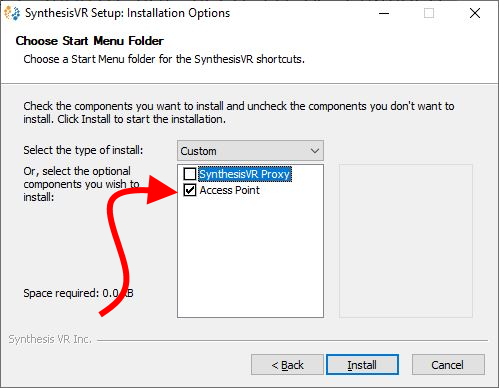
- Select “ACCESS POINT“
- Click “Install“.
- Click “Close” once the installation is done.
- Congratulations! Your Synthesis VR Access Point has been successfully installed.
- Once the VR Station is successfully installed, Synthesis VR Access Point app will pop up on your taskbar, the icon tray, and desktop.
