How Can We Help?
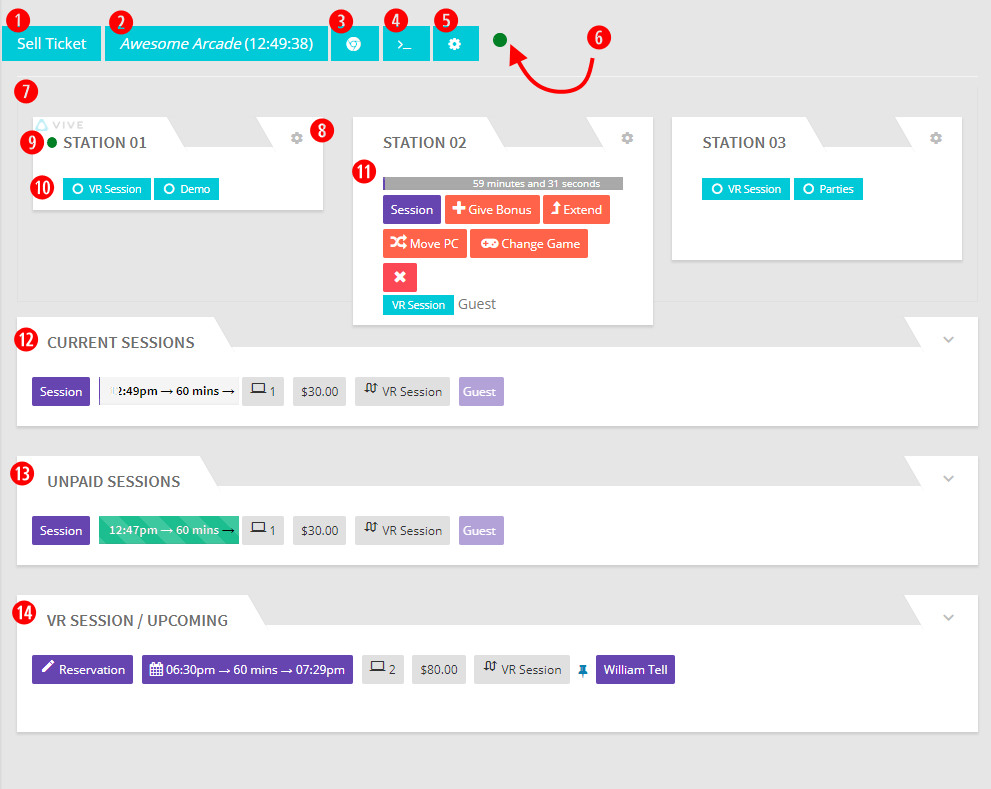
- SELL TICKET: This is the button you would press to bring up the internal booking pop up so you can book a session in advance.
- ARCADE NAME: If you manage multiple arcades, clicking this will bring up a dialog to choose the location you want to manage.
- LIFE PRESERVER: Clicking this will bring up some various local settings for the Your Arcade Section. Purple is on, Blue is off. Clicking on the life preserver icon will remove the settings.

3a: Repeat Sounds Alarm: When a customer chooses the “Request Help” in the headset, the alarm on the dashboard can be set to either repeat or not repeat.
3b. Disable Button Hints: When you hover over buttons in the dashboard, having this turned on will provide hints about what each button does.
3c. Maximized Session Controls: When this is turned on, the buttons in the stations will expand and contract to depend on if the cursor is hovering over them. When set to off, this will keep all the buttons maximized.
3d. Show Panic Button: This will display a panic button that, when pressed, will end all sessions and display a warning to customers in the headset.
3e. Update VR Stations: This will allow you to Update VR Stations remotely.
3f: Voice Notice On Help Request: You can change the “needs your attention” text to something more suitable
3g: Play Audio File on Session End: This allows you to change the audio file that plays at the end of a session. - COMMAND CALLS: This allows you to run various Command Calls through the interface. Please refer to https://synthesisvr.com/knowledge-base/command-calls/ for more details about this.
- GEAR ICON: This will allow you to lock out the “Content Events” button on the Access Point app of the stations.
- SERVER STATUS ICON: This indicates if the server is in a good state. Green is good, red is bad. Note that if the server is not detected, you will see an additional warning as well.
- THE STATIONS: This section shows all stations currently in the subscription. New stations will not be seen here until they have been subscribed.
- STATION GEAR ICON: This will bring up various station controls. You can close this by clicking on the X button in the top right. This menu can additionally be brought up by clicking on the name of the station.
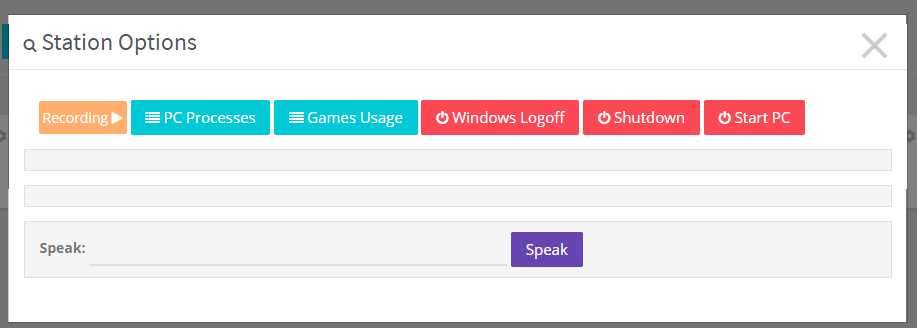
. Note that this uses OBS and needs to be set up in advance. Please check this link: https://synthesisvr.com/knowledge-base/setup-obs/
8a. Recording: This will bring up the recording menu to start capturing
8b. PC Processes: This will show you the current processes running on the station8c. Games Usage: This will show you currently used games during the current session
8d. Windows Logoff: This will log the current user out of the station
8e. Shutdown: This will shut down the specific station
8f. Start PC: This will allow you to start the station if you have Wake on LAN set up. You can check this link for further details: https://synthesisvr.com/knowledge-base/setting-up-wake-on-lan/
8g. Speak: You can type something in the space available and when you click on the “Speak” button, the customer will hear a text-to-speech translation of the text you typed. - STATION STATUS ICON: This will indicate is running the SynthesisVR Access Point. Green is good, nothing will show if the Access Point is not recognized as running.
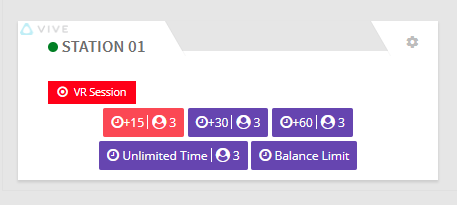
- EXPERIENCE TYPES: These are all the experience types that you have available on that particular station. When you click on these, a menu of duration options will appear. This is generally how you might start a walk-in Session. Note that stations not available for this type of experience would be hidden and to select multiple stations for this walk-in session you will need to click on the corresponding experience types on the other stations you are looking to add to this session. You can “turn off” this menu by clicking on the Experience Type.
- STATION IN SESSION: This is what a station in session would look like. It shows the current time remaining, customer name, and various controls for the running session. You have the following options for this station:
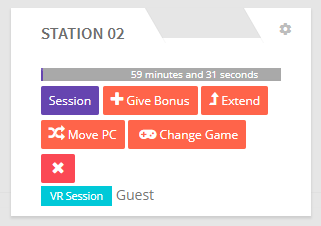
11a. Session: Clicking this will bring up the Session information and will allow you add customer information, take payment, add notes, and do a few admin functions.
11b. Give Bonus: You can add up to 10 minutes of bonus time to a session (which will be announced to the customer). Or you can take up to 30 minutes away (not announced to the customer).
11c. Extend: This will allow you to extend the session by times that were set within the Work Rule. Note that this can be set to less than the total number of station within a session so only some stations get extended.
11d. Move PC: If something happens to the station (cable breaks, PC breaks, headset malfunctions, etc), you can use this to move the session to another station. Time will continue after the move.
11e. Change Game: This will allow you to change the game across all the stations within a session. You can also limit which stations will have their game changed. This is great for multiplayer game changes.
11f. End Session: You can manually end the session using this button. Note that this can be set to less than the total number of stations within a session so only some stations get their session ended. - CURRENT SESSIONS: This is the currently active session or sessions. If you click on the Session button, this will bring up the Session information and will allow you to add customer information, take payment, add notes, and do a few admin functions.
- UNPAID SESSIONS: If there are any unpaid sessions, this is where they will show up. Clicking on the Session button will allow you to take payments for the session.
- UPCOMING SESSIONS: This will list all upcoming sessions. It will be broken down by session type and will also have a section for all sessions grouped together. In both sections, sessions will be listed in chronological order. If you click on the Session button, this will bring up the Session information and will allow you to add customer information, take payment, add notes, and do a few admin functions. Additionally, if you click on the time of the session you will be able to move the session to a new time. Lastly, if you click on the customer name (if a customer is attached to a session), you will be able to access customer-related information including everything you might normally do from the Customer’s Section of the Dashboard.